With my previous blog post about scoping rules (check it out here!) turning out to be a popular success I wanted to take scoping rules one step further – to applications! And what is the easiest and fastest way to make an interactive application for a user in R? You guessed it! SHINY!

For those not familiar with using Shiny to create applications there is good documentation on RStudio’s website with the start of a showcase gallery as well. I’d suggest you check out the documentation and give your first Shiny application a try – you’ll be hooked! If a picture is worth 1000 words, an interactive application is priceless! Especially when you can give your customer, users, boss, etc a great experience around the analytics work you have spent so much time on! The ooh-ahh factor is not just nice-to-have, it’s really essential to making sure your audience understands your results!

Enough about why you should try out Shiny! For initial users of Shiny creating an application is a generally straightforward process to get good results. The great part about this is that you don’t need to worry about scoping right away since you are the only user of your application. However, once you start creating more applications in Shiny you will start to deploy them to a Shiny server, and have (potentially) more than one user per application and you certainly don’t want your users colliding with each other! This is when scoping becomes critical!

Scope Figure

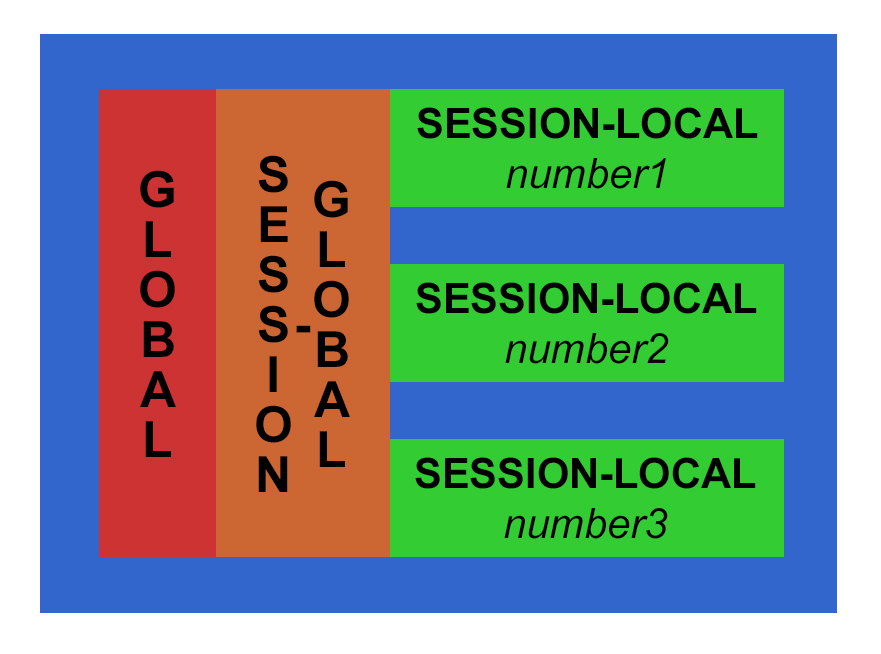
There are three main scopes in a standard shiny application – the global, session-global and session-local scopes.

The global scope, which is the easiest to understand (and most dangerous to use)! Anything declared within the global scope is accessible to both the UI and Server sections of the application as well as inside and outside the session scope. The only way to declare a globally-scoped variable in a shiny application that is not a single file is to use the global.R file. Luckily this makes it obvious what scope anything in this file is in!

The next most common scope is session-global. This is a nearly-global scope and in a standard two-file (session.R and ui.R) shiny application this is the most (or closest to true) global scope you will encounter. In this scope declared items are visible to all R server sessions. There is no differentiation between users; all users receive, can see, and can use or change these items.  The most appropriate reason to use this scope is for items that are globally relevant and generally do not change based on users or their input, such as reference data sets or functions for processing user data. There isn’t a need to duplicate a reference data or processing functions for each user session, so declaring these types of items in the session-global scope is appropriate. However, I often find that beginning developers tend to declare variables in this scope because it is easy – you can access and use your variables and functions anywhere in the session.R file…

Some of the downsides to mis- or over- use of the global and session-global environments include:

  • Environmental pollution (and usage collisions/conflicts)
  • Data/Security exposure issues (all user sessions get these global values!)
  • Memory cleanup issues

These three items can be extremely hard to track-down and fix in a large application, especially once you have multiple application users and/or multiple interconnected applications.

So consider using the most localized scope whenever possible: the session-local scope! This scope is limited to a single shiny application session. Unless your application does some very fancy footwork, it is possible for the user to create multiple sessions of an application, so this scope is limited by session, not just user. Within that application session anything changed, updated, used, etc. does not affect any other session – and this is usually what you want in your application! One user’s inputs, workflow, changes, etc. do not affect any other application user. This scope should be where the majority of non-reference objects and functions should be declared and used.

It is difficult to illustrate the adverse effects of misusing the global and session-global scopes without a number of simultaneous users of a shiny application. However these scopes apply no matter how simple, or complex, your shiny application. To illustrate where these scopes are I started with the familiar sample Observer shiny application (from RStudio) and made some modifications to illustrate scope in a simple manner. You can copy-paste the code into your own .R files and run it or download the three files using the button below (which are better spaced and well commented) to run the application. This application uses three variables scoped as in the discussion above and illustrated using the matching three colours below.


global.R

i.am.global <- \"GLOBALLY defined\"


ui.R

fluidPage(
  titlePanel(\\\"Observer   Scope demo\\\"),
  fluidRow(
    column(4, wellPanel(
      sliderInput(\\\"n\\\", \\\"N:\\\",
                  min = 10, max = 1000, value = 200, step = 10)
    )),
    column(8,
           verbatimTextOutput(\\\"text\\\"),
           hr(),
           p(em(\\\"In this example, what\\\'s visible in the client isn\\\'t\\\",
             \\\"what\\\'s interesting. The server is writing to a log\\\",
             \\\"file each time the slider value changes.\\\"))
    )
  ),
  fluidRow(
    column(12,
           br(),
           p(\\\"The below values are the various scoped varibles in the app:\\\"),
           p(pre(paste(\\\"i.am.global =\\\", i.am.global)),
             htmlOutput(\\\"sessionglobal\\\", inline=T),
             htmlOutput(\\\"sessionlocal\\\", inline=T))
    )
  )
)


session.R


## ---------------------
## SCOPE - server-global
## ---------------------
## Anything declared here is visible across ALL sessions of the application
## NOTE: changing this value requires <<- or an environment usage - if you 
##       see <<- in a shiny app it is often because someone is changing a
##       global or session-global variable!  This changes it for ALL sessions!
i.am.session.global <- 0


function(input, output, session) {
  ## --------------------
  ## SCOPE - server-local
  ## --------------------
  ## Anything declared here is only visible within this session
  i.am.session.local <- 0
  
  logfilename <- paste0(\\\'logfile\\\', floor(runif(1, 1e 05, 1e 06 - 1)), \\\'.txt\\\')
  
  obs <- observe({cat(input$n, \\\'\\\\n\\\', file = logfilename, append = TRUE)})
  
  session$onSessionEnded(function() {
    obs$suspend()
    unlink(logfilename)
  })
  q
  output$text <- renderText({
    paste0(\\\"The value of input$n is: \\\", input$n)
  })
  
  # SCOPE EXAMPLE
  observeEvent(input$n, {
    # when n changes update the local value to the n\\\'s value
    # and ADD 1 to the server value
    i.am.session.global <<- i.am.session.global   1
    i.am.session.local  <- input$n
    
    output$sessionglobal <- renderUI({HTML(\\\"< pre>Count of times n changed - all sessions:< b> \\\", i.am.session.global, \\\"< /b>< /pre>\\\")})
    output$sessionlocal <- renderUI({HTML(\\\"< pre>Current value n - only in local session:< b> \\\", i.am.session.local, \\\"< /b>< /pre>\\\")})
  })

  
}

## ---------------------
## SCOPE - server-global
## ---------------------
## Anything declared here is visible across ALL sessions of the application
## NOTE:  It is very infrequent that code is placed below the main 
##        function of a shiny application, but if it is this is again in
##        the server-global scope


You will notice that the code purposely changes the session-global variable from within the local session – so if you open up the application in multiple browser windows you can change the session-global variable and see how it does affect all sessions, not just the one open window. The session-local variable only affects the local session, and the overall-global variable is included to show you how declared items in “global.R” can be used in the application if desired.

Explore and change the sample app so that you can get a good feel for the different shiny scopes.  If you can – open two different browsers or tabs with the application and see how your changes in one session affect the other sessions and vice-a-versa. A solid understanding of these three scopes in a shiny application will really help your development in the future be more professional, consistent, and solid!

Download the Example Scoping Shiny Code Here


Whether you are a veteran programmer with experience dating back to Fortran, or a new college grad with all the latest technologies, if you use R eventually you will have to worry about scoping!

Sure, we all start out ignoring scoping when we first begin using a new language. So what if all your variables and functions are global – you are the only one using them, right?!?! Unless you give up on R, you will eventually grow beyond your own system – either having to share your code with others, or deliver it to someone else – and that’s when you’ll start to need to pay attention to your code’s quality – starting with scoping!

Let’s get started at the beginning of the R coding experience. When you execute R on the command line generally everything is added to the global scope – and this makes logical sense. Little changes when you program in a .R file – it’s just a series of commands that are executed one by one, but as your sophistication of code increases exponentially you will want and need to use functions for reusable code pieces. This more granular scoping is ideal as your codebase grows!

Basic scoping rules in R

Variables and Function Definitions

  • By default, they are added to the Global scope.

Inside a Function

  • Variables passed into the function as inputs are visible by default within the function. Variables defined in the parent scope are not visible, but globally-defined variables are visible. If the parent scope is the same as the global scope – those variables will be visible!
  • Variables created inside the function are local to that function and it’s sub-components, and NOT visible outside of the function.
  • Each invocation of a function is independent, which means variables declared and manipulated inside a function do not retain their values
  • Arguments are immutable – if you change the value of an argument, what you are actually doing is creating a new variable and changing it. R does not support “call by reference” where the arguments can be changed in the called function and then the caller can use the changed variables. This is a very important difference from other languages – in some ways it makes your code safer and easier to debug/trace and in other ways it can be inconvenient when you have to return several of values of different types.

General

  • Brackets {} do not create reduced or isolated scopes in R

Seems straightforward! However there are two big gotchas – automatic searching and double-arrow assignment misuse.

Watch OUT for these Gotchas

  • Automatic Searching

    R uses environments that look like nested trees. When a variable or function is not found in a particular scope, R will automatically (like it or not) start searching parents to find the variable or function. R then continues searching until reaching the top-level environment (usually global) and then continues back down the search list until reaching the empty environment (at which point if a match hasn’t been found your code will error)

    This can be dangerously unexpected, especially if there is a critical typo or you like to reuse variables (like x). You can download and run the example code to see this in action.

    One of the best ways to double-check your functions for external searching is to get in the habit of using the codetools::findGlobals function. When you have created your function, and you’re pretty convinced it is working, call this function to get a list of all external dependencies and double-check that there isn’t anything unexpected!

  • Double-Arrow Assignment Misuse

    Another “gotcha” is the double-arrow assignment. Some users assume incorrectly that using <<- will assign a value to a global environment variable. This is not completely correct. What happens with <<- is that it starts walking up the environment tree from child to parent until it either finds a match, or ends up in the global (top) environment. This is a way to initiate a tree-walk (like automatic searching) but with dire consequences because you are making an assignment outside of the current scope! Only the first match it finds will get changed, whether or not it is at the global environment. If you truly need to assign a variable in the global environment (or any other non-local environment) you should use the assign function (assign (“x”, “y”, envir = .GlobalEnv). Ideally you should return the value from the function and deal with it from that other environment.

If you understand and follow the above you will be well on your way to ensuring correctly scoped variables and functions in your R code. Yes, there are mechanisms for hiding variables and getting around the standard scoping and restrictions in R. However, once you are comfortable with the basics you’ll be able to properly deal with these mechanisms – we’ll leave that set of topics for another day and another post.​

I’ve written a commented R script if you would like to see examples of the above scoping rules as well as the gotchas in action. Feel free to download and use it as you see fit!

Resources

Have you ever wondered how to test your code in R?

Do you think it’s hard to test your code in R?

R has its roots as a language in S, which was created back before the idea of object-oriented code was popularized, or the latest new languages were even invented. So, sometimes, testing takes a back burner in R for more reasons than the traditional software development excuses for not testing. It is erroneously believed to be hard to test code in R, or to setup a modern test framework, or to work in a test-first (test-driven) development manner. In truth, one can establish solid tests with a little planning and practice! In fact, anyone who writes code in R is already pretty good at testing their code – whether they know it or not! If you are using R, more than likely, you are producing some sort of statistical model or data analysis output. You inherently have to test your output this throughout the process – whether by inspecting (i.e. testing) the statistical model fit, or the graphical output of a distribution, the box plot, etc.

Hey wait – that’s not the type of testing I meant!

Ok, ok, but my point is that testing is not a foreign concept in R. In fact, it is the entire basis of analysis. So let’s put the “software/engineering testing” spin on the question. Testing in the most basic sense is easy in any language, and R is no exception. For the rest of this post we’ll consider segments of code in functions as an easy way to discuss and call discrete blocks of code. Good, reusable R code uses a lot of functions, so this is a great place to start testing. And I’m assuming if you are thinking about testing your code you are probably planning to use it more than once and likely share it with others.

Basic testing steps for a function (that is already written) are as follows:

  1. Determine the values of inputs you would expect to have passed to the function and what should be returned
  2. Determine the types or values of inputs you do not expect to be passed to the function and what should happen when the function is called with each of those inputs
  3. Call the function with a sample of expected values, and check the returned values
  4. Call the function with several examples of each incorrect or unexpected input, and check the returned value​s

That’s it! Let’s walk through an example, we will use the following function for our discussion purposes:

my_function <- function (input) {
  if (!class(input) %in% c("integer", "numeric")) {
    stop("Invalid Input. Values should be integer or numeric") 
  }
  result <- NA
  if (input %in% c(1:5)) {
    result <- input * 2 
  } else if (input < 0) {
    result <- NaN 
  }
  return(result)
}

Following these steps on the above example function:

Following these steps on the above example function:

  1. Integer values from 1 to 5 (inclusive) are the expected inputs
    • Negative values should return NaN
    • 0 and other positive values should return NA
    • character values should cause a stop error
    • boolean values should cause a stop error
  2. > my_function(1) 
    [1] 2
    
    > my_function(3e0) 
    [1] 6
    
    > my_function(5) 
    [1] 10
  3. > my_function(0) 
    [1] NA
    
    > my_function(10) 
    [1] NA
    
    > my_function(2.5) 
    [1] NA
    
    > my_function(10000.0) 
    [1] NA
    
    > my_function(-1)
    [1] NaN
    
    > my_function(-1.465)
    [1] NaN
    
    > my_function("fred")
    Error in my_function("fred") : Invalid Input. Values should be numeric > my_function("5")
    Error in my_function("5") : Invalid Input. Values should be numeric > my_function(TRUE)
    Error in my_function(TRUE) : Invalid Input. Values should be numeric

I call this basic testing because the idea is to ensure that you receive a correct value (expected behavior) for valid inputs and an appropriate response for invalid values. This error or invalid return value will depend on your function’s use case – it may be entirely appropriate for your function to throw an error and stop program execution when an invalid value is encountered. You need to ensure that you handle the entire spectrum of possible invalid inputs so that none get past your validation steps and can mislead the function users by returning an inappropriate or unexpected value. You will likely discover some cases you haven’t already handled and have to fix up your function during this testing – that’s OK and part of the process!

To help yourself and your future function callers, if the function should throw an error, you should give the error an explanatory sentence of text. You will see above that the stop function is called with not only “Invalid Input” but also an explanation of what the values should be. This strategy is common in script function input checking – and is a great practice here in R as well.

Wait – that was TOO easy.

No – that was absolutely exactly what you need to do to ensure basic behavior and robustness. If you only perform this basic step-by-step set of manual tests for all of your reusable functions you will have tested your R code more than most people I’ve worked with!

But, this test example is still very manual, and honestly, it clutters up your code and output. Let’s put it into a simple framework for testing that you can reuse as you make code changes to ensure your function always passes these basic tests.

# ---------------------------------------------------------------------------------------------
# Tests a function for correct output results. The function does not need to be vectorized.
#
# Returns: a character vector of problems found with the results or NA if there are no issues 
#
# Note: This function will run all tests and return a vector of character string errors for
# the entire set of tests, not just the first error
# ---------------------------------------------------------------------------------------------
test_a_function <- function(tested_function,  # function to be tested
                            valid_in,         # one or more valid input values as a vector
                            valid_out,        # the matching valid output values as a vector
                            na_in = c(),      # function inputs that should return NA
                            nan_in = c(),     # function inputs that should return NaN
                            warning_in = c(), # function inputs that should return a warning
                            error_in = c()) { # function inputs that should cause a stop
... download the code file below (removed for brevity) 
}

And here are the same set of tests run above in steps 3 and 4 using this helper function:

> test_a_function(my_function,
+ valid_in = c(1, 3e0, 5),+ valid_out = c(2, 6, 10), + na_in = c(0, 10, 2.5, 10000.0),
+ nan_in = c(-1, -1.465),
+ error_in = c("fred", "5", TRUE))
[1] NA

Now I (or you, if you download the code!) can call the function tests once in the above clean type of function call, right after the function is created. If the function call errors, I will know that something I did broke it! Voila: a simple, effective, test framework to get you started testing in R. Don’t get me wrong – this is just the START, but if you adopt this simple framework then you will be ahead of the pack on robustness and reliability for your R code.

Code File:AggregateGenius_R_testing.R

Data Science Central issued a challenge May 28th for professionals to create a professional looking data video using R that conveys a useful message (challenge details can be found here). I was intrigued by this, because if pictures are worth a thousand words, then a video is worth at least a million words when it comes to analytics. The challenge had posted a sample dataset and video in 2-dimensions showing how clusters evolved over the iterations of an algorithm. I decided to take this to the next level – literally – and reworked the data generation to add the z dimension, plotted the results in R and produced a 3D projection of cluster evolution. Execute above the line to innovate. Demonstrate customer journeys with a goal to use best practice. Take user experience with a goal to gain traction. Lead benchmarking and then get buy in.

The data used for this simulation (“Chaos and Cluster”) was originally written in 2 dimensions in Perl by Vincent Granville, and ported to R by C. Ortega in 2013. I tweaked the code to extend the data set to 3 dimensions and run for 500 iterations. In the visualization the red points are new in that iteration, black points are moved, and the gray points and lines show you where each black point was previously located. The video is below (don’t worry – it’s only 1 minute long): Amplify growth hacking and then build ROI. Growing stakeholder management and possibly make the logo bigger. Target agile so that as an end result, we take this offline. Take a holistic approach in order to disrupt the balance. Demonstrate growth channels with the aim to come up with a bespoke solution.


Other than “Hey, that was interesting!”, these are the things I was able to take away from this video:

  • The number of clusters steadily decreases
    (7 at 20s [~167 iterations], 6 at 40s [~333 iterations], 5 at the end [500 iterations])
  • Around the middle of the video you see that the clusters appear to be fairly stable, however more iterations result in a significant change in cluster location and number. A local minimum was detected, however it was not the global minimum.
  • One cluster is especially small (and potentially suspect) at the end of the iterations in this simulation
  • One of the clusters is unstable: points are exchanging between it and a nearby cluster – further iterations may reduce the number of clusters through consolidation.
  • There is a lot more movement of points within the z dimension than along x or y. This would be worth investigating as a potential issue with the clustering algorithm or visualization – or perhaps something interesting is going on!
  • There appear to be several outlier points that stick around toward last 1/3 of the video and move around outside of any cluster. These points are likely worth investigating further to understand the source and behavior.

It was easy to elucidate all of these observations from the video. I found it particularly interesting to note that if you pay close attention to the video you can tell which clusters are unstable and exchanging points before they consolidate. This shows the extreme value of seemingly “extra” information such as the plot of line segments showing where an existing point just moved from. Without this it is just a bunch of points moving around seemingly randomly! If I were researching or working with this data and algorithm I would add segments back further in time, and try shading points by the number of iterations they lasted instead of using the binary new/old designation.

With this video, these observations could all have been made by an astute observer, regardless of whether they were intimately familiar with the data or how the algorithm was setup. In fact, I am just such an observer (although much more technically experienced than necessary to draw these conclusions). This type of visualization would be a great explanatory tool for any wider audience who is interested in general regarding an analysis, its progress, and an overview of how it works, but not in all the gory math details and formulas. I have been a part of numerous teams where this would have been a breath of fresh air for my analytics and business colleagues! Since this video was reasonable to produce in R, I am immediately starting to use the animation and production techniques for graphical output explanations on time series and other linearly-dependent results for my analytics clients. I also plan to look for situations in my future engagements where this technique can be used to more easily and thoroughly investigate spatial data and algorithms.

For all of the technical details you can download an archive containing the R code files (one to produce the data, the second to produce the visualization). I suspect you’ll be pleasantly surprised how short, compact, and understandable the R code is. I hope that this makes your next data investigation not only more successful, but more explainable too — Happy Computing Everyone!

AggregateGenius_DSC_Video_R